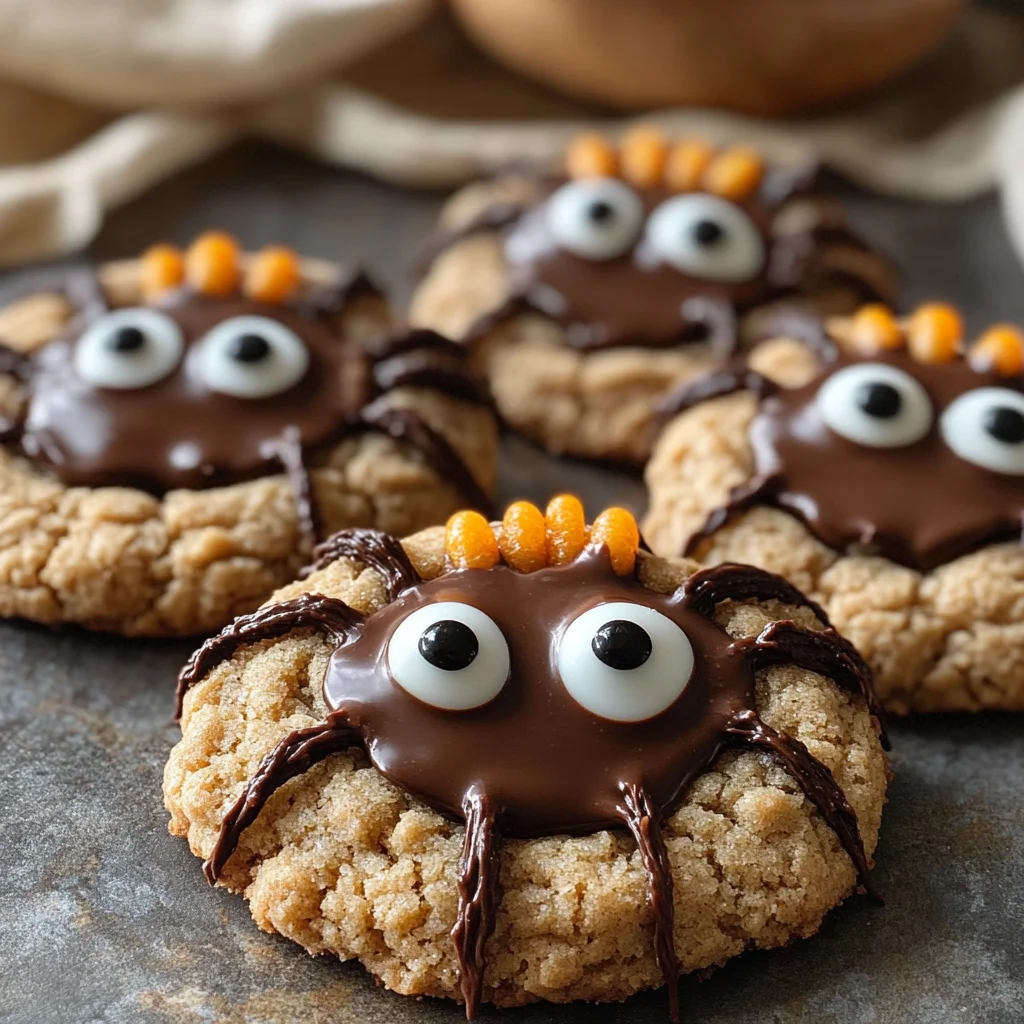
Peanut Butter Spider Cookies
Soft peanut butter cookies topped with chocolate and candy eyes create a whimsical treat that delights both kids and adults alike. These Peanut Butter Spider Cookies are perfect for Halloween gatherings, school events, or simply to enjoy at home. The combination of creamy peanut butter and rich chocolate makes them irresistible, while their playful presentation adds a fun twist to any dessert table.
Why You’ll Love This Recipe
- Fun Presentation: The spider design makes these cookies a hit at parties and gatherings.
- Easy to Make: Simple steps ensure that even beginner bakers can whip up a batch quickly.
- Delicious Flavor: The blend of peanut butter and chocolate is a classic combination that everyone loves.
- Versatile Treat: Great for Halloween, birthday parties, or as an everyday snack.
- Kid-Friendly Activity: Involve the little ones in decorating the cookies for extra fun!
Tools and Preparation
To make your baking experience smooth and enjoyable, gather the necessary tools before starting. Having everything ready will help you focus on creating these adorable cookies.
Essential Tools and Equipment
- Mixing bowl
- Electric mixer
- Baking sheets
- Parchment paper or silicone mats
- Cookie scoop or tablespoon
- Microwave-safe bowl
Importance of Each Tool
- Mixing bowl: A large mixing bowl is crucial for combining ingredients thoroughly without spills.
- Electric mixer: This tool saves time and effort when creaming butter and sugars together.
- Baking sheets: Good-quality baking sheets promote even baking, ensuring perfectly cooked cookies.
- Cookie scoop or tablespoon: Using a scoop helps you create uniform cookie sizes for consistent baking.

Ingredients
Soft peanut butter cookies topped with chocolate and candy eyes, crafted into playful spider treats.
For the Cookies:
- 1/2 cup unsalted butter, room temperature
- 1/2 cup packed brown sugar
- 1/3 cup granulated sugar
- 3/4 cup creamy peanut butter
- 1 large egg
- 1 teaspoon vanilla extract
- 1 1/2 cups all purpose flour
- 1 teaspoon baking soda
- 1/2 teaspoon baking powder
- 1/2 teaspoon salt
- Granulated sugar, for rolling
For the Toppings:
- 24 mini Reese’s Peanut Butter Cups
- 1/2 cup semi-sweet chocolate chips
- Candy eyeballs
How to Make Peanut Butter Spider Cookies
Step 1: Prepare Mini Peanut Butter Cups
Unwrap approximately 24 mini peanut butter cups, place them in a bowl, and freeze until needed. This helps the chocolate maintain shape when added to warm cookies.
Step 2: Preheat the Oven
Preheat the oven to 350°F (175°C) and line baking sheets with silicone mats or parchment paper.
Step 3: Cream the Butter and Sugars
In a large mixing bowl, combine unsalted butter, packed brown sugar, and granulated sugar. Beat with an electric mixer for 1 minute until the mixture is smooth and fluffy.
Step 4: Add Wet Ingredients
Add creamy peanut butter, large egg, and vanilla extract to the creamed mixture. Beat briefly until just combined.
Step 5: Combine Dry Ingredients
Add all purpose flour, baking soda, baking powder, and salt. Mix on low speed or fold by hand just until no flour streaks remain. Do not overmix.
Step 6: Shape the Dough
Portion dough using a small cookie scoop or tablespoon. Roll dough into uniform balls, then coat each ball in granulated sugar.
Step 7: Bake the Cookies
Arrange dough balls 2 to 3 inches apart on prepared sheets. Bake for 8 to 11 minutes or until edges crack and cookies begin to turn golden.
Step 8: Add Peanut Butter Cups
Remove cookies from the oven and immediately press a frozen mini peanut butter cup into the center of each cookie. Allow to cool on the baking tray for 15 to 20 minutes.
Step 9: Melt Chocolate
Place semi-sweet chocolate chips in a microwave-safe bowl. Microwave on 50% power for up to 3 minutes, stirring every 60 seconds until fully melted.
Step 10: Create Spider Legs
Transfer melted chocolate to a squeeze bottle or sandwich bag with the corner trimmed. Pipe four spider legs on each side of each cookie.
Step 11: Add Candy Eyes
Dab a small amount of melted chocolate on the back of each candy eyeball and press onto the peanut butter cups. Let chocolate set before moving cookies.
Now you’re ready to enjoy these delightful Peanut Butter Spider Cookies!
How to Serve Peanut Butter Spider Cookies
Peanut Butter Spider Cookies are not just visually appealing; they also make delicious treats for any occasion. These cookies can be served in various fun and creative ways that will delight both kids and adults alike.
For Halloween Parties
- Spider-Themed Display: Arrange the cookies on a black platter or spider web tablecloth for a spooky touch.
- Cookie Bags: Place individual cookies in clear bags tied with orange ribbons for easy party favors.
With Milk or Plant-Based Alternatives
- Classic Pairing: Serve your cookies with a cold glass of milk to enhance their flavor.
- Non-Dairy Options: For a vegan twist, try almond or oat milk, which complements the peanut butter nicely.
As School Treats
- Lunchbox Surprise: Pack these cookies in children’s lunchboxes as a fun treat.
- Bake Sale Favorites: They are perfect for bake sales, attracting buyers with their unique design.
At Family Gatherings
- Dessert Table Feature: Make these cookies the highlight of your dessert table at family gatherings.
- Interactive Activity: Let kids help decorate additional cookies with extra candy eyes and chocolate legs.
How to Perfect Peanut Butter Spider Cookies
Perfecting Peanut Butter Spider Cookies can elevate them from good to great. Follow these tips to ensure they turn out perfectly every time.
- Use Room Temperature Ingredients: Ensure the butter and egg are at room temperature for better mixing and texture.
- Don’t Overmix the Dough: Mix just until combined to keep your cookies soft and chewy.
- Chill the Dough Balls: Refrigerate the dough balls for 10-15 minutes before baking to maintain their shape.
- Watch Baking Time Closely: Keep an eye on your cookies; remove them when they start turning golden at the edges.
- Let Them Cool Properly: Allow the cookies to cool on the tray before transferring them to avoid breaking.
Best Side Dishes for Peanut Butter Spider Cookies
Pairing side dishes with Peanut Butter Spider Cookies can enhance your dessert experience. Here are some great options to consider.
- Fruit Salad: A refreshing mix of seasonal fruits balances the sweetness of the cookies.
- Yogurt Parfait: Layer yogurt with granola and berries for a creamy contrast that complements the flavors.
- Cheese Platter: Include mild cheeses like brie or cream cheese for a savory counterpoint.
- Veggie Sticks with Hummus: Crunchy vegetables dipped in hummus offer a healthy side option that kids love.
- Ice Cream Sundae Bar: Set up a DIY sundae bar where guests can add cookie crumbles on top of their ice cream.
- Chocolate-Covered Pretzels: The salty crunch pairs well with sweet peanut butter, making it an addictive snack.
Common Mistakes to Avoid
Baking Peanut Butter Spider Cookies can be fun, but there are common pitfalls that can lead to less-than-perfect results.
- Not measuring ingredients accurately – Use measuring cups and spoons for precise ingredient amounts. This ensures consistent texture and flavor in your cookies.
- Overmixing the dough – Mix just until ingredients are combined. Overmixing can make cookies tough instead of soft and chewy.
- Skipping the chilling step – Freezing the peanut butter cups is crucial. If you forget this step, they may melt too much when pressed into warm cookies.
- Not checking cookie doneness – Keep an eye on your cookies as they bake. They should be lightly golden at the edges; overbaking will result in dry cookies.
- Using old baking soda or powder – Always check expiration dates on leavening agents. Fresh ingredients help achieve the right rise and texture.
- Ignoring cooling time – Allow cookies to cool on the tray before transferring them. This helps maintain their shape and prevents breakage.
Storage & Reheating Instructions
Refrigerator Storage
- Store Peanut Butter Spider Cookies in an airtight container.
- They can last for about 4-5 days in the refrigerator.
Freezing Peanut Butter Spider Cookies
- Place cooled cookies in a single layer in a freezer-safe container.
- These cookies can be frozen for up to 3 months.
Reheating Peanut Butter Spider Cookies
- Oven – Preheat to 350°F and warm for 5-7 minutes for best results.
- Microwave – Heat individually for 10-15 seconds until slightly warm; be careful not to overheat.
- Stovetop – Use a non-stick skillet over low heat for 1-2 minutes, flipping once.
Frequently Asked Questions
What are Peanut Butter Spider Cookies?
Peanut Butter Spider Cookies are delightful treats made with soft peanut butter cookies topped with chocolate and candy eyes, designed to resemble playful spiders.
How do I ensure my Peanut Butter Spider Cookies come out soft?
To keep your cookies soft, avoid overbaking them and allow them to cool properly after removing from the oven.
Can I customize my Peanut Butter Spider Cookies?
Absolutely! You can add different types of chocolate or nuts, or even use various candy toppings for a fun twist.
How long do Peanut Butter Spider Cookies last?
These cookies typically last about 4-5 days when stored in an airtight container in the refrigerator.
Final Thoughts
Peanut Butter Spider Cookies are not only adorable but also incredibly delicious. Their rich peanut butter flavor paired with chocolate makes them a perfect treat for gatherings or special occasions. Feel free to customize them with your favorite candies or toppings to make them truly unique!
Peanut Butter Spider Cookies

Indulge in the whimsical delight of Peanut Butter Spider Cookies! These soft, chewy cookies are topped with creamy chocolate and adorned with playful candy eyes, making them a fun treat for any occasion, especially Halloween. With their irresistible peanut butter flavor paired with rich chocolate, these cookies are sure to enchant both kids and adults alike. They’re easy to prepare and perfect for baking parties or family gatherings. Involve your little ones in decorating these adorable spider cookies, creating lasting memories while enjoying a delicious snack!
- Prep Time: 15 minutes
- Cook Time: 10 minutes
- Total Time: 25 minutes
- Yield: Approximately 24 servings 1x
- Category: Dessert
- Method: Baking
- Cuisine: American
Ingredients
- 1/2 cup unsalted butter, room temperature
- 1/2 cup packed brown sugar
- 1/3 cup granulated sugar
- 3/4 cup creamy peanut butter
- 1 large egg
- 1 teaspoon vanilla extract
- 1 1/2 cups all purpose flour
- 1 teaspoon baking soda
- 1/2 teaspoon baking powder
- 1/2 teaspoon salt
- Granulated sugar, for rolling
- 24 mini Reese’s Peanut Butter Cups
- 1/2 cup semi-sweet chocolate chips
- Candy eyeballs
Instructions
- Preheat your oven to 350°F (175°C) and line baking sheets with parchment paper.
- In a mixing bowl, cream together unsalted butter, brown sugar, and granulated sugar until fluffy.
- Mix in creamy peanut butter, egg, and vanilla extract until well combined.
- Gradually add all-purpose flour, baking soda, baking powder, and salt; mix until just combined.
- Roll dough into balls, coat in granulated sugar, and place on prepared sheets.
- Bake for 8 to 11 minutes until edges crack; immediately press a frozen mini peanut butter cup into each cookie center.
- Melt chocolate chips in the microwave; pipe legs onto cookies and press on candy eyeballs.
Nutrition
- Serving Size: 1 cookie (28g)
- Calories: 150
- Sugar: 10g
- Sodium: 70mg
- Fat: 7g
- Saturated Fat: 3g
- Unsaturated Fat: 4g
- Trans Fat: 0g
- Carbohydrates: 18g
- Fiber: 1g
- Protein: 3g
- Cholesterol: 10mg